
Installation of new main doorframe and main door.
 This week, our contractor from Contat Decor and Transportation came by to remove the old main door frame and install the new door frame and new main door shown above. We did not want the standard HDB type of door offered as standard under renovation packages and went to source for our own main door, having in mind the types found in condos. We managed to meetup with Jonas from Contat Decor and Transportation. He's a young guy who's totally in tune with what young couples like ourselves want in a modern main door. He was very helpful and spend a deal of time bringing out the various samples of the different parts of the main door from the wood lamination to the lockset to the handles etc.
We spent about 780 dollars on the entire main door, doorframe and the door parts such as the lockset, handles etc ( we took the more expensive route of equipping the door with YALE branded items instead of cheaper Taiwanese or China sourced locksets ). It was a worthwhile splurge for us as we feel it complements the contemporary modern look of our apartment. We will put up more pictures of the door once the varnishing of the door and painting of the doorframe is done. You can contact Jonas at 64425270 or email at jonas@contatdecor.com for more details.For those who are keen on such a door, I have provided the specifications of our main door as follows :
Door material : Single-Leaf solid veneer
Wood type : Fancy Dark Oak 816 ( greyish-light brown coloured )
Standard items : 3 Stainless steel hinges / 1 Magnetic stopper / Installation and Laquer /
1 eye viewer piece
Additional items : 1 set Mah Stainless steel Chrome Plated Door Lock / 1 set Yale 521 Roller Lockcase 60mm / 1 set Yale 70mm T-T anti-drill locking cylinder with 5 anti duplicate keys/
1 set Yale Key Covers / 1 set Chrome/Stainless steel Pull Handles ( 25diameter x 450mm) /
1 piece Etech solid chrome Door Guard
Electrical Works Part 2
 Shown : LEGRAND Mallia 2 rocker switches, Mallia 1 rocker 2-way switch with LED Green light(For Storage Water Heater) and Mallia double socket switch with Mallia switch boxes.
 Shown : Switch Panel for Kitchen Cabinet on extreme right of picture
 LEGRAND Mallia 2 rocker switch ( $4-90 each ) with LEGRAND Mallia 2 rocker box ($1.00 each )
 LEGRAND Mallia Double Sockets with box ( $11.40 each ). The switches on the sockets are designed to enable ease of reach with the switches mounted on the outside.
 TV / FM Outlet with LEGRAND Mallia box ( $18.00 each )
Lighting ( Part 1 )
The electrician also put up the first phase of lightings for our apartment. We did not want to put up the Hall, Dining lights as we wanted the furniture to arrive first so that the positioning would be accurate. Also , we did not put up the master bathroom light for fear of damage as there was still reno work to be done with the ventilator fan and fixed glass shower panel. Similarly for the main door light and lights for the kitchen due to workers moving in and out. White basket caged light ( C127 300) from Citilights located in our Orange Rm
 Rocket Light ( Common Toilet ) in line with the funky theme
 Boxed Spotlights for Walk In Wardrobe
 (ABove) Wash area cylinder tube lighting
 Store Room circular light
Our Toilet Bowl sourced from Sim Siang Choon ( $200 ). We liked the modern clean look and it comes with slow closing cover. We also attached a water rinser from SSC for $15. The Hangrohe Focus E Single lever basin mixer chrome ($110 after 25% discount) comes with pop up waste installed on a white square sink sourced from Hoe Kee ( $90 )
Sourced from Ferrera Asiapac : 3 spray Celestial Handshower with Creztial silver hose and adjustable wall mounted holder. ( Complete set- $70 )
Hansgrohe Focus E Shower Mixer wall mounted chrome ($114 after 25% discount )
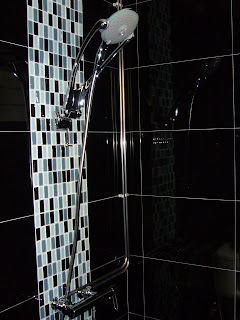
 The entire mixer and shower head set. Note steel piping
Master Bathroom
 For our Masterbath, we installed Hansgrohe Raindance All Rounder Shower set complemented by a Hangrohe Axor Mixer. We liked the flexibility of the All Rounder design as it can be used as a massage overhead shower and also easily detached to be a handheld showerhead.
 Wallpaper
This week, the good people from Goodrich came to install the wallpaper for the feature wall in the master bedroom. It is worthwhile to pay more to have their installers do it for you as the workmanship is quite good, in particular along the wire cabling and switches. The white spot near the bottom of the floor is our electrical socket. Total cost was $655 with installation. We chose this design as it was in line with the room's colour theme of grey and the flower motifs were quite elegant with the red giving a bright splash of coulour to brighten the room's grey tone. The motif was also not too gaudy. Oh yes, shown here is also our half installed lighting ( the spiky ball ) for the master bedroom. We have not installed the halogen bulbs and crystal attachments yet for fear of damage by movers for the bedframe and furnishing.
Carpentry Works - Walk in Wardrobe Vanity Counter
Walk in wardrobe vanity cupboard with mounted sink was installed. The sink will be installed later when the solid top is up. As we required more storage space, we asked for overhead cupboard and also below the vanity counter. We chose black laminated covering for the cupboard. We also asked jacky to customize a mirror for the vanity. The cost increased also due to the need for mounting of a solid top to ensure water resistance.
 Carpentry Works - Shoe Cabinet
The carpenters did up the installation of the cabinet with black glossy laminate. The shoe cabinet also hides the MCB and provide additional storage shelf space at the top.
 Black Laminated Shoe Cabinet

 Wedding Favors chosen by us : Wedding Bears and Chocolate( 1pc bitter and 1 pc sweet choc )
 Living Room of our Bridal Suite ( #15-21 )
 We sourced the bridal posse and car decor from Redbox, with whom we had used for our ROM. Ching - the proprietor of Redbox is a very dedicated and professional florist. She puts 110% into her floral creations and takes pride in her work. She may charge a little more but it shows in the quality of the flowers used(100% fresh flowers) and the efforts in the presentation. She is also someone whom we found easy to converse with, relate to and communicate our needs.
  Posse of red roses with black feather inserts to blend in with Gayle's wedding gown that feature black embroidery.
  Ching's handiwork for our wedding car 'Just Married' Sign with accompanying sunflowers and yellow satin cloth ribbon. ( No organza pleaasse! ) If you are interested in engaging Redbox, please visit their website at
 Hall lighting point and Downlight points
 3 lighting points for the kitchen( Stove, sink and wash area )

 Supporting frame for mounting of false ceiling
 Week 6 saw the fabrication and completion of the false ceiling and lightbox for the hall and foyer of the main bedroom entrance.
 FABRICATION AND INSTALLATION OF FALSE WALL BACKING FOR WALK IN CLOSET
 Our ID also fabricated and installed a false wall backing which the walk in wardrobe will be built into. The wall will also serve to partition the study area from the walk in wardrobe.
 We will be mounting an IKEA Full height mirror at the side of the wall. We took the dimensions of the mirror and got our ID to build the sidewall to the mirror dimensions so that it will be a good fitting.
 Master Bedroom Laminated Flooring from Supreme
  Common Room Laminated Flooring
 In preparation for the painting of the house, our contractor gave a first wash up of the house which finally meant we could step into the house without our shoes and also to see the flooring as one whole complete uncovered layer.
 Finally , Shiny homogeneous flooring of the Hall ( Above and Below pictures ) !


 Our cleaned kitchen , common toilet and master toilet! Sparkling !

 Dining Area Wall Colour - Nippon 5069 Galaxy ( Dark Grey )
 Master Bedroom


 Common Toilet
 Kitchen


 ( Above )Unfinished Wooden backing for dish rack and shelving cum sink section
 Our half installed Rinnai RB2C-G Inner Burner Hob
 ( Above ) 1st section of Walk In Wardrobe with glossy grey laminate
 ( Below ) We constructed a pulmet for installation of a suede curtain in place of doors ( to reduce cost ) to reduce dust retention and for privacy.